

Setting up a Rust Development Environment
In this post we'll be discussing one way to set up your machine for Rust development. There are different ways, particularly related to the text editor, so feel free to skip what is irrelevant to you. We'll focus on:
- Setting up Rust via Rustup.
- Valuable tools like
clippyandrustfmt. - Configuring VS Code for Rust.
- Debugging with the command line and inside of VS Code.
- Using different compile targets.
Everything we do should be functional on both Linux and MacOS, on Windows your mileage may vary. I, unfortunately, don't have a Windows instance to test on.
In order to finish this all up you'll need to have the build-essentials (Ubuntu/Debian), base-dev (Arch), or XCode (Mac) installed already.
Setting up Rust via Rustup
Rustup is an official Rust project that allows us to install, manage, and update multiple Rust toolchains. It can be installed easily via:
curl https://sh.rustup.rs -sSf | sh
After a brief download Rustup will prompt us for some configuration. Just accept the defaults here:
Current installation options:

   default host triple: x86_64-apple-darwin
     default toolchain: stable
  modify PATH variable: yes

1) Proceed with installation (default)
2) Customize installation
3) Cancel installation
After we'll be prompted to run the following command to update the current shell with the changes:
source $HOME/.cargo/env
At this point we can run cargo and rustc to confirm that we have Rust and Cargo installed. Also confirm that rustup exists since we'll need that later.
Next it's advisable to install the Rust source and documentation locally for later use when offline or for tools such as the autocompletion we set up later.
rustup component add rust-src
rustup component add rust-docs
Eventually we'll want to update our Rust installation, the following command will update all toolchains and components.
rustup update
Eventually you may encounter a project which prefers to use Rust's nightly builds. You can easily install the nightly (or beta) version alongside stable.
rustup toolchain install nightly
You can change the default toolchain of the system with rustup default stable or rustup default nightly, but it's advisable to keep it to stable and set overrides for projects that use nightly. You can do that by navigating to the project directory and running the following:
rustup override set nightly
For now that's all we need to know about Rustup, so let's move on.
Valuable Tools
We'll cover four valuable tools for working with Rust:
rust-clippy- A linter.rustfmt- A code formatter.racer- An autocompletion utility.rls- A language server (for symbol search etc.)
rust-clippy
Why do we want this? The Rust compiler is already quite strict, clippy goes a step further and helps prevent some things which are valid but bad practice. This can help prevent unexpected problems later in your code.
clippy requires nightly in order to run. Earlier we installed nightly alongside stable with rustup toolchain install nightly, so we can use it without any issues.
We'll need to use nightly to install it, so we just need to run the following:
rustup run nightly cargo install clippy
Now let's create a test case. Run cargo init --bin test && cd test then modify the src/main.rs file to have to have the following:
fn main() {
    // Clippy warns on statements with no effect, like this one.
    true;
}
Now we can run clippy with the following command:
rustup run nightly cargo clippy
This should yield a warning from clippy:
warning: statement with no effect
 --> src/main.rs:2:5
  |
2 |     true;
  |     ^^^^^
  |
  = note: #[warn(no_effect)] on by default
  = help: for further information visit https://github.com/Manishearth/rust-clippy/wiki#no_effect
Excellent. You can see the different lints which clippy detects here. You can configure various lints in the clippy.toml according to their options listed in the wiki.
To disable (or warn instead of deny) various lints you can add the deny and allow flags to your crate attributes:
#![cfg_attr(feature = "cargo-clippy", deny(empty_enum))]
#![cfg_attr(feature = "cargo-clippy", warn(indexing_slicing))]
#![cfg_attr(feature = "cargo-clippy", allow(print_with_newline))]
rustfmt
Why do we want this? Having consistent, standard automated styling in a project (and across many projects) can be useful for code review, attracting new contributors, and avoiding unproductive discussions.
rustfmt is a code formatting tool akin to gofmt. Unlike clippy, it runs happily on stable. To install it:
cargo install rustfmt
At this point we can run cargo fmt to format a repository. It runs rustfmt in the 'replace' mode which creates backup files with a .bk extension. If our project is already in version control we may not want this. If that is the case we can edit rustfmt.toml to include the following:
write_mode = "overwrite"
The rustfmt.toml lets us configure the various options found in rustfmt --config-help. Now let's edit the main.rs we made later to have some obviously poor style:
fn       main    ()
{ true
; }
Then we can run cargo fmt and we can see that our file is correctly formatted again.
Gotcha: rustfmt is still not in perfect shape and will occasionally butcher the formatting of otherwise normal looking code. Your mileage may vary for the time being.
racer
Why do we want this? It saves us some time looking through documentation and helps us discover functionality as we type.
racer is a code completion utility that's used in various editor addons and with rls which we'll set up next. Earlier we ran rustup component add rust-src which is important for racer.
First, install it:
cargo install racer
Next we need to set an environment variable so racer knows where to look for the Rust source. In your ~/.bashrc (or ~/.zshrc etc) add the following line:
# Mac
export RUST_SRC_PATH=${HOME}/.rustup/toolchains/stable-x86_64-apple-darwin/lib/rustlib/src/rust/src
# Linux
export RUST_SRC_PATH=${HOME}/.rustup/toolchains/stable-x86_64-unknown-linux-gnu/lib/rustlib/src/rust/src
If you're not on MacOS or Linux you will need to set this to what is shown as default in rustup show.
Then you can test that racer works by doing a test run via the command line:
racer complete std::io::B
You should see several matches from this. At this point racer is set up and ready to be used in your editor or with rls.
rls
Why do we want this? It enables a much richer development experience and extends on the capabilities of racer.
rls is a language server implementation for Rust. It provides things like code completion, goto definitions, rich refactoring, and some other nice features.
Unlike the other tools we've described rls is still in the alpha stages of development, and thus does not have the easiest install story. If you don't use VS Code it might be worth skipping this step for now.
In whatever directory you store all your git repositories in, clone down rls and build it with nightly:
git clone https://github.com/rust-lang-nursery/rls.git
cd rls
rustup override set nightly
cargo build --release
Next we need to set up an environment variable. We need to set DYLD_LIBRARY_PATH and RLS_ROOT (you'll probably need to adjust this to your repository clone):
# Mac
export DYLD_LIBRARY_PATH=${HOME}/.rustup/toolchains/stable-x86_64-apple-darwin/lib
export RLS_ROOT=${HOME}/git/rust/rls
# Linux
export DYLD_LIBRARY_PATH=${HOME}/.rustup/toolchains/stable-x86_64-unknown-linux-gnu/lib
export RLS_ROOT=${HOME}/git/rust/rls
At this point it should be set up. We'll test and use it later when we configure VS Code.
Configuring VS Code for Rust
I've been using VS Code for Rust for several months and it's quite pleasant. As with any text editor there are many knobs to tweak, so we're just going to focus on the directly relevant ones.
You may use a different editor, and that's totally fine. Have at! I still regularly reach for
vimfor minor edits and some of my colleagues quite enjoy theiremacs. Diversity is good, use what is best for you and let others use what is best for them.
First, let's download VS Code. Drop over to their website and grab the installer. I'm a bit silly and use the 'Insiders' version that is released nightly, but you don't need to.
In order to run code from the command line we may need to open up VS Code and open the 'Command Palette' with Shift+Command+P on Mac, or Shift+Control+P on Linux. In it, enter shell command and look for the Shell Command: Install 'code' command in PATH option. After doing this any new shell we open should be able to run code.
Extension: Rust
The 'Rust' extension provides some helpers around build, formatting, and other useful things. It can be installed by selecting the bottom 'Box with border and smaller box in the top right corner' button on the sidebar and searching for 'Rust'. You can take a look at the readme before you install.
Extension: rls_vscode
We'll need node installed, you can do this via your package manager (If you're on a Mac brew works great.)
Once this is done we can install the rls_vscode extension. Since rls isn't released yet we need to do all the fun work ourselves! Nagivate to your regular git directory and clone the repository and install its dependencies.
git clone https://github.com/jonathandturner/rls_vscode.git
cd rls_vscode
npm install
Next step is to build the extension, which we do through VS Code itself. Run code . in the repository we just cloned. In the VS Code window, select the 'Crossed out bug' icon and hit the green 'Play Button' beside the words 'Launch Extension' in the left. A new VS Code window will pop up, you can just close it.
Now that the extension is built we can set up a symlink to install it into VS Code (if you're using Insiders the directory is .vscode-insiders):
ln -s ${HOME}/git/rust/rls_vscode/ ${HOME}/.vscode/extensions/rls_vscode
Later you can update the extension with a similar process. Due to the development pace it's advisable do to this every once in awhile.
Next, quit VS Code and reopen it. Open up any Rust project and you should see in the blue bar at the bottom "RLS analysis: Starting up", this should change to "RLS analysis: Done" shortly after.
Gotcha: If you reboot your machine you will need to open a terminal before opening VS Code, or use the integrated terminal in VS Code and restart it, before RLS will be able to successfully start. There are some ways around this but they're rather annoying in their own right. Perhaps in the future there will be a setting in VS Code.
Extension: Better TOML
The Rust ecosystem frequently uses TOML files for configuration. While 'Rusty code' provides basic TOML support, the 'Better TOML' goes a bit further, and is worth installing as well.
Extension: LLDB Debugger
The 'LLDB Debugger' (that's 'Low Level Debugger Debugger' for those paying attention) extension later if we want to debug our Rust applications from inside VS Code. It can be installed from the Extensions tab. You'll also need Python's six library which you can install via pip install six.
We'll talk about how to use this extension in the next section.
Debugging Rust Code
Let's scaffold out a super basic application to test our debugging on before we get on to any real experimentation. We'll run cargo init --bin example and set src/main.rs to:
pub enum Direction { North, South, East, West }

pub fn is_north(dir: Direction) -> bool {
    match dir {
        Direction::North => true,
        _ => false,
    }
}

fn main() {
    let two = 1+1;
    println!("{}", two);

    let points = Direction::South;
    let compass = is_north(points);
    println!("{}", compass);
}
This gives us something actually worthwhile to use the debugger on. Let's debug!
On The Command Line
The first step before debugging is to build, then fire it up with the debugger:
cargo build
rust-lldb ./target/debug/example
From here we can interact with the program like we normally would with LLDB. (Yes, there is rust-gdb, you're free to use that too!)
For example:
(lldb) breakpoint set -f main.rs -l 3
Breakpoint 1: where = example`example::is_north + 10 at main.rs:3, address = 0x0000000100000ffa
(lldb) process launch
Process 8376 launched: '/Users/hoverbear/git/rust/example/target/debug/example' (x86_64)
2
Process 8376 stopped
* thread #1: tid = 0x2c222, 0x0000000100000ffa example`example::is_north(dir=South) + 10 at main.rs:3, queue = 'com.apple.main-thread', stop reason = breakpoint 1.1
    frame #0: 0x0000000100000ffa example`example::is_north(dir=South) + 10 at main.rs:3
   1   	pub enum Direction { North, South, East, West }
   2
-> 3   	fn is_north(dir: Direction) -> bool {
   4   	    match dir {
   5   	        Direction::North => true,
   6   	        _ => false,
   7   	    }
(lldb) print dir
(example::Direction) $0 = South
With VS Code
After installing the 'LLDB Debugger' extension you can set a breakpoint by clicking to the left of the line numbers, you'll see a big red dot marking a breakpoint. In order to actually debug we need to do a couple things:
Add the following to .vscode/launch.json:
{
    "version": "0.2.0",
    "configurations": [
        {
            "type": "lldb",
            "request": "launch",
            "name": "Debug",
            "program": "${workspaceRoot}/target/debug/example",
            "args": [],
            "cwd": "${workspaceRoot}",
            "preLaunchTask": "cargo",
            "sourceLanguages": ["rust"]
        }
    ]
}
Then, add a .vscode/tasks.json with the following:
{
    "version": "0.1.0",
    "command": "cargo",
    "isShellCommand": true,
    "args": ["build"],
    "showOutput": "always"
}
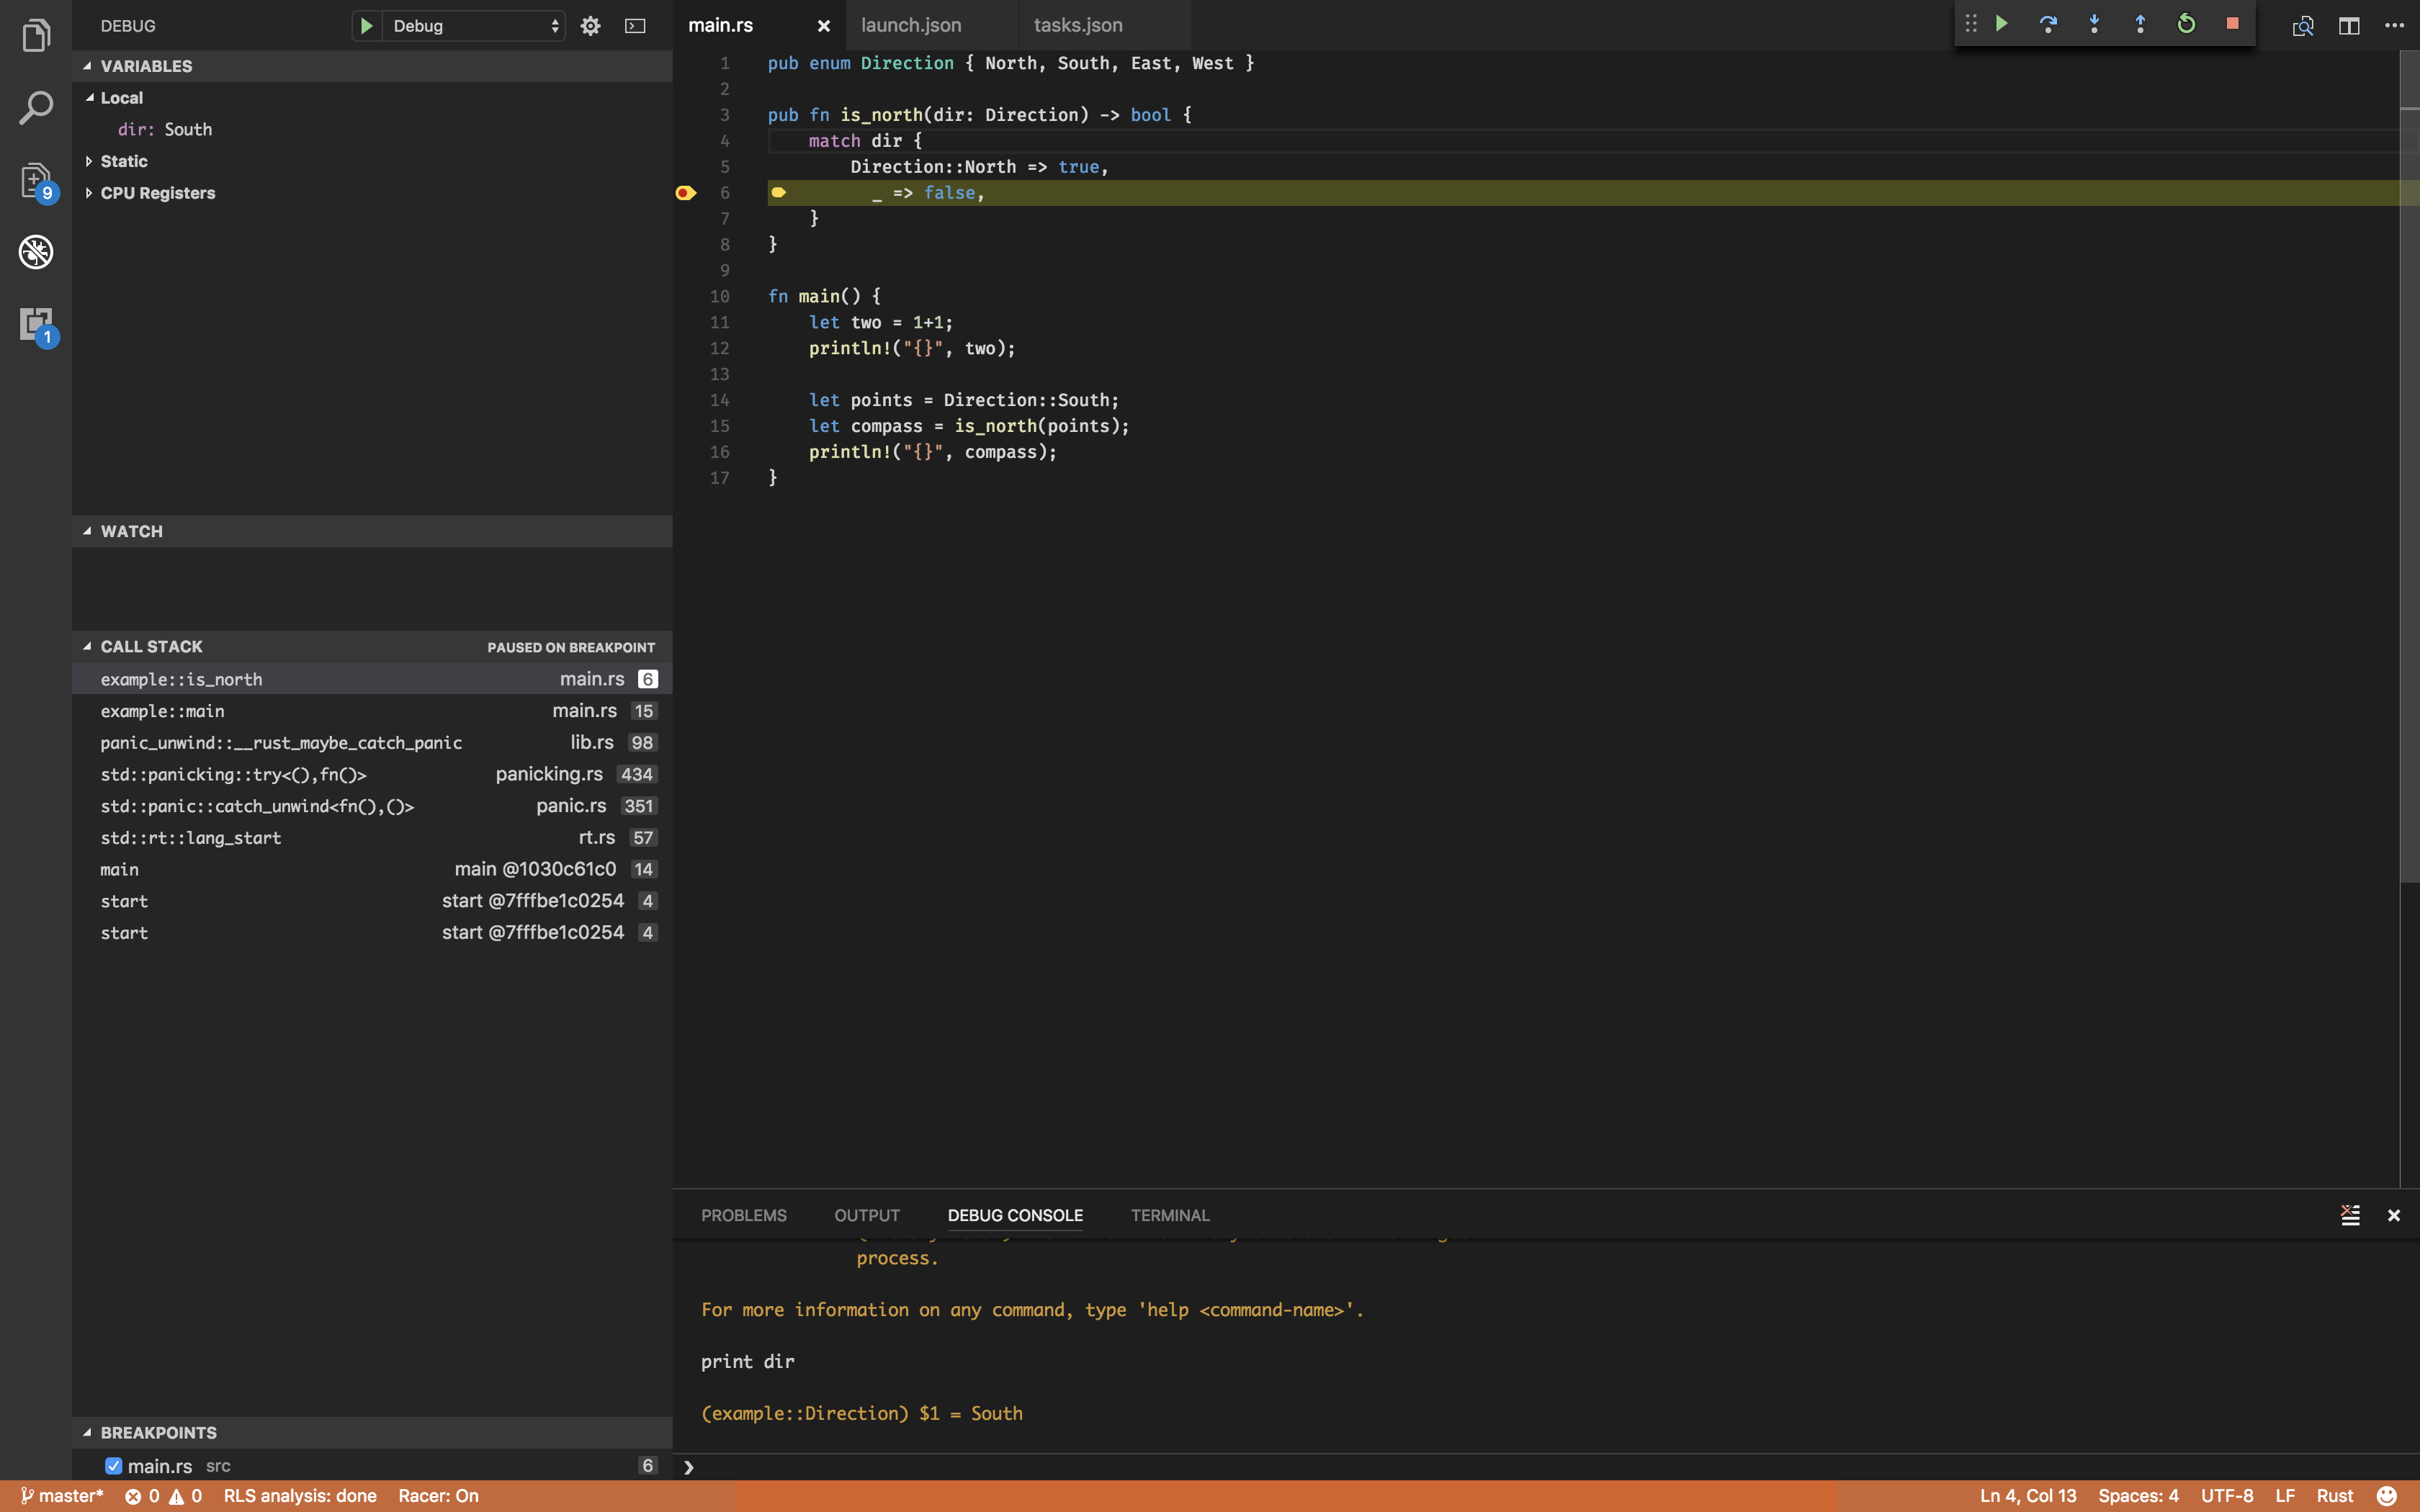
Next let's set a breakpoint somewhere. Finally we can go to the 'No Bugs' icon and hit the 'Play' and we should see something like this:
Compiling to Different Targets
So far we've been building x86_64-apple-darwin. If we were using Linux we'd be building x86_64-unknown-linux-gnu most likely. Let's target asmjs-unknown-emscripten (that is, Javascript) for fun.
First we need to install the emcripten package. On Mac this can be found in brew via brew install emscripten, some Linux distributions also package emscripten, but you can also set it up via the guide here.
If on Mac, the following probably needs to be changed in ~/.emscripten:
LLVM_ROOT = "/usr/local/opt/emscripten/libexec/llvm/bin"
#LLVM_ROOT = os.path.expanduser(os.getenv('LLVM') or '/usr/bin') # directory
#BINARYEN_ROOT = os.path.expanduser(os.getenv('BINARYEN') or '/usr/bin') # directory

# Avoid annoying popups about Java.
#JAVA = 'java'
Now you can compile our example in Web Assembly, then run it:
cargo build --target=asmjs-unknown-emscripten
node target/asmjs-unknown-emscripten/debug/example.js
The output should be:
2
false
Targetting other systems and architectures works similarly, the biggest stumbling block is installing the toolchain (in this case it was emscripten.)
Closing Thoughts
At this point we have a functional Rust development environment that can target our native system as well as asm.js. Our editor supports debugging and has nice features like autocomplete. Finally, we have handy tools like clippy to help us detect errors.
Some of the tools and extensions we're using are still alpha, or don't work perhaps as well as we might hope, but things are only getting better! If you're interested, you can even get involved with these different projects to help them be even more awesome. Every few weeks you can go and do a quick update of things and see the improvements.
Now, we don't have any excuses not to have fun with Rust! Why not find something that looks interesting and try to make your first PR? Can't find something? Check out /r/rust and look at the projects people are talking about, look at the E - Easy issues on rustc, or tackle something small from rust-rosetta!
If you're part of a company looking to adopt or use Rust you may be interested in Asquera's courses or consulting to help you. Just send me an email and I'll make sure your message gets passed on to the right person!